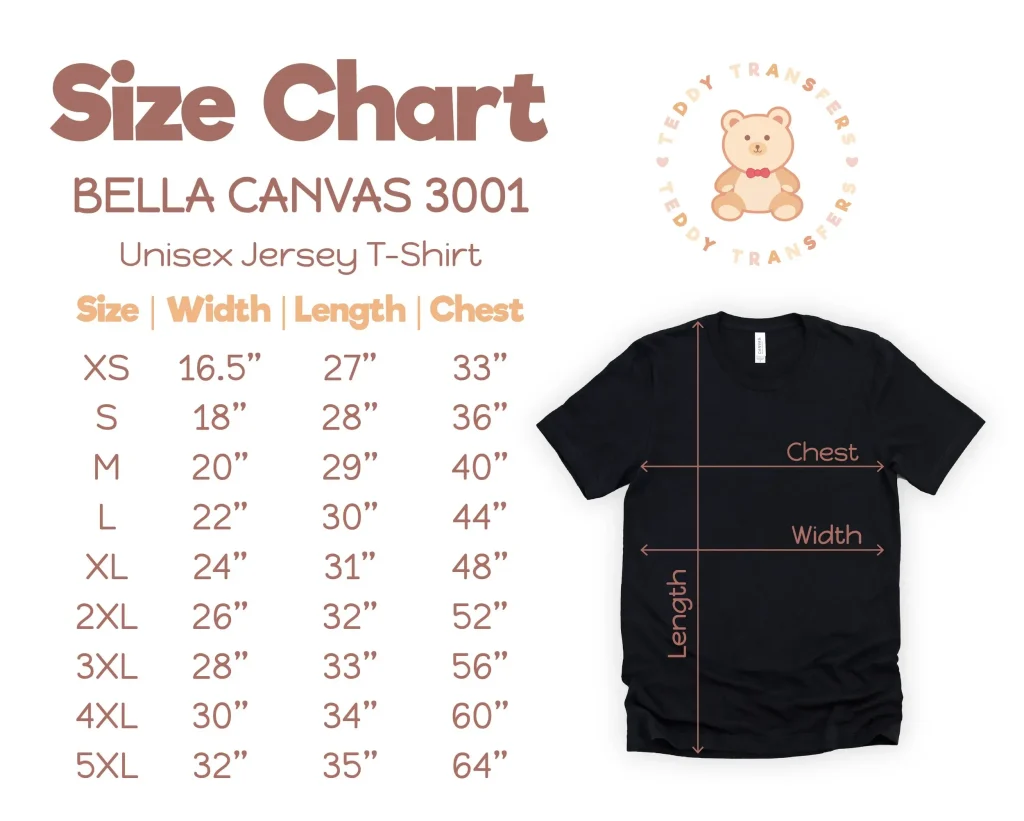
When it comes to sizing DTF transfers, precision is key to ensuring that your printed designs turn out beautifully on garments. The process of aligning sizes accurately is critical, as errors can lead to unsatisfactory results, including poor placement and loss of image quality. This guide delves into common DTF transfer mistakes to help you achieve the perfect fit for any fabric type, while also providing valuable DTF transfer sizing tips. Understanding design scaling is essential; it allows for optimal visibility and clarity, letting your artwork shine. Moreover, a consistent approach to print area measurement will not only enhance the overall aesthetic but will also ensure the longevity of the final product, making it essential to avoid common pitfalls in DTF printing.
Sizing DTF transfers involves understanding the nuances of print size and its impact on the final garment appearance. This specialized technique, known as Direct-to-Film transfer, requires careful attention to detail to prevent common pitfalls that can arise when scaling designs. A misstep in design range or neglecting fabric compatibility DTF can lead to substandard outcomes. In this exploration, we will highlight key principles for successful transfer application, and how to steer clear of frequently encountered design and measuring errors. By emphasizing proper techniques, you will elevate your DTF printing game and ensure remarkable results every time.
Understanding DTF Transfer Mistakes
When diving into the world of Direct-to-Film (DTF) transfers, it’s essential to acknowledge the common mistakes that can derail your printing efforts. Many newcomers overlook crucial aspects of design scaling, leading to either oversized prints that distort the design or undersized prints that fail to capture the intended impact. The importance of correct sizing cannot be emphasized enough; a minor tweak can mean the difference between a mediocre product and one that dazzles. This highlights the need for meticulous planning and understanding of the inherent limitations of the printable media.
Another prevalent mistake involves ignoring the specifications of the garment. Each fabric type interacts differently with DTF transfers, which makes it critical to tailor your designs accordingly. For instance, a design that looks perfect on cotton may not adhere well to polyester, resulting in peeling or fading. Therefore, those entering the DTF realm should educate themselves about fabric compatibility and incorporate this knowledge into their design scaling to avoid costly errors.
Frequently Asked Questions
What are the common DTF transfer mistakes when sizing designs?
Common mistakes when sizing DTF transfers include incorrect design scaling, ignoring fabric types, not accounting for underlays, forgetting print margins, mismeasuring the print area, and neglecting test prints. Each of these can negatively affect the final product’s appearance and durability.
How important is design scaling in DTF transfer sizing?
Design scaling is crucial in DTF transfer sizing because an improperly sized design can result in pixelation or loss of visual impact. Always use vector files for scalability and ensure that the design meets the intended garment size specifications.
What role does fabric compatibility play in DTF transfer sizing?
Fabric compatibility is essential for DTF transfer sizing, as different fabrics react differently to transfers. For instance, DTF works best on 100% cotton but may not adhere properly to synthetic fabrics like polyester. Always choose fabric types that are compatible with DTF transfers to ensure effective application.
What are some DTF transfer sizing tips for beginners?
DTF transfer sizing tips for beginners include ensuring correct design scaling, understanding fabric compatibility, allowing for print margins, measuring print areas accurately, accounting for underlays, and always conducting test prints to verify size and application before full production.
Why is measuring the print area important for DTF transfer sizing?
Measuring the print area is vital in DTF transfer sizing to avoid oversized or misaligned prints. By measuring each garment style accurately, you can ensure that the transfer fits well and maintains a professional appearance.
How can testing improve my DTF transfer sizing process?
Testing helps identify sizing issues before the full print run, allowing you to verify the design’s size and application on actual fabric. This forward-thinking approach can save time and materials, ensuring high-quality results for your DTF transfers.
| Common Mistakes | Description |
|---|---|
| Incorrect Design Scaling | Failing to scale designs correctly can lead to loss of visual impact or pixelation. |
| Ignoring Fabric Type | Not considering fabric compatibility can result in adhesion issues and poor application. |
| Not Accounting for Underlays | Underlays are essential for effective design adherence; neglecting them affects aesthetics. |
| Forgetting Print Margin | Not maintaining at least a 0.25-inch margin may lead to critical elements being cut off. |
| Mismeasuring the Print Area | Using standard measurements can result in poor fit; accurate measurement is essential. |
| Neglecting Testing | Skipping test prints can cause costly production mistakes; always test before full runs. |
Summary
Sizing DTF transfers correctly is fundamental for successful garment printing, as it influences the overall quality of the final product. To avoid common pitfalls, focus on the proper scaling of designs according to garment size, consider the fabric’s characteristics, ensure adequate underlays are included, maintain appropriate margins, measure print areas accurately, and conduct test prints to verify your setup. By paying attention to these aspects of sizing DTF transfers, you can achieve professional results and ensure customer satisfaction in an increasingly competitive market.


